Google search

Basic and advanced computer skills like Excel with macros, How to speed up your PC, C, CPP, Java programming, HTML, JavaScript, PHP, Wordpress, all web tools, Android tutorials, MySQL Tutorials, WAMP server installation. etc.

HTML5 Validation

Following example states the use of HTML5 control form validation.

<!DOCTYPE html>
<html>
<body>
<h1> HTML5 Form Validation </h1>
<hr>
<form name=f1>
Enter name: <input type="text" pattern="[a-zA-Z]+" title="Your name without space" required /> </br>
Email id: <input type="email" required /> </br>
WebAddress: <input type="url" required/> starts with http:// </br>
Phone number: <input type="tel"  pattern="^\d{2}-\d{10}" required/> [e.g:91-9876543210]  </br>

Enter date: <input type="date"> </br>
Enter Age: <input type="number" size="6" name="age" min="18" max="99" value="21"></br>

<input type="submit" />
</form>
</body>
</html>

Out of the above page is: 

Thank you for reading!
Keep reading here

CSS blocks-and-menus

In this tutorial you'll able to create a css [cascading style sheet] blocks for your web site.
Below are the some of examples you can refer .
Creating beautiful hyperlink buttons with CSS blocks.
Example 1.
<html>
<head>
<style> 
#corner1{
  border-radius: 15px 50px 30px 5px;
   background: skyblue;
   padding: 20px; 
   width: 100px;
   height: 25px; 
}

#corner2{
  border-radius: 15px 50px 30px 5px;
   background: green;
   padding: 20px; 
   width: 100px;
   height: 25px; 
}


#corner3{
  border-radius: 15px 50px 30px 5px;
   background: red;
   padding: 20px; 
   width: 100px;
   height: 25px; 
}

#corner4{
  border-radius: 15px 50px 30px 5px;
   background: cyan;
   padding: 20px; 
   width: 100px;
   height: 25px; 
}
</style>
</head>
<body>
<p id="corner1"> About us </p>
<p id="corner2"> Contact us </p>
<p id="corner3"> Login here </p>
<p id="corner4"> siteMap </p>
</body>
</html>

output of the above code is: 


Example 2.
<html>
<head>
<style> 
#corner1{
  border-radius: 20px 20px 0px 0px;
   background: khaki;
   padding: 20px; 
   width: 950px;
   height: 25px; 
background-image: url("ubuntu.png");
}

#corner2{
  border-radius: 15px 15px 15px 15px;
   background: skyblue;
   padding: 50px; 
   width: 100px;
   height: 25px; 
}

#corner3{
   border-radius: 15px 15px 15px 15px;
   background: green;
   padding: 50px; 
   width: 100px;
   height: 25px; 
}

#corner4{
  border-radius: 15px 15px 15px 15px;
   background: magenta;
   padding: 50px; 
   width: 100px;
   height: 25px; 
}

#corner5{
  border-radius: 15px 15px 15px 15px;
   background: red;
   padding: 50px; 
   width: 100px;
   height: 55px; 
font-size:22pt;
color:red;
background-image: url("solid.jpg");
background-color: blue;
}
</style>
</head>
<body>
<p id="corner1"><marquee> Hello world </marquee> </p>
<p id="corner2"> Hello world </p>
<p id="corner3"> Hello world </p>
<p id="corner4"> Hello world </p>

<table border=0 cellpadding=2 cellspacing=2> 
<tr bgcolor=khaki>
<th> Course Name</th> 
<th> Duration </th>
</tr>

<tr>
<td> Web  </td> 
<td> 2 Months </td>
</tr>
<tr>
<td> Android App Development </td> 
<td> 2 Months </td>
</tr>
</table>

<h2 id="corner5"> Welcome to inline CSS </h2>
<img src="d:\web-design.jpg" id="corner5">
<h3 id="corner4"> Welcome </h3>
</body>
</html>

output:


Example 3.
<html>
<head>
<style> 
#corner1{
  border-radius: 35px 15px 50px 5px;
   background: khaki;
   padding: 20px; 
   width: 100px;
   height: 25px; 
}

#corner2{
  border-radius: 35px 15px 50px 5px;
   background: skyblue;
   padding: 20px; 
   width: 100px;
   height: 25px; 
}


#corner3{
  border-radius: 35px 15px 50px 5px;
   background: green;
   padding: 20px; 
   width: 100px;
   height: 25px; 
}

#corner4{
  border-radius: 35px 15px 50px 5px;
   background: skyblue;
   padding: 20px; 
   width: 100px;
   height: 25px; 
}

#corner5{
  border-radius: 15px 15px 15px 15px;
   padding: 50px; 
   width: 100px;
   height: 55px; 
font-size:22pt;
color:red;
background-color: yellow;
}
</style>
</head>
<body>
<p id="corner1">Home </p>
<p id="corner2"> About us </p>
<p id="corner3"> Login here </p>
<p id="corner4"> Contact us </p>

<table border=0 cellpadding=2 cellspacing=2> 
<tr bgcolor=khaki>
<th> Course Name</th> 
<th> Duration </th>
</tr>

<tr>
<td> Web  </td> 
<td> 2 Months </td>
</tr>
<tr>
<td> Android App Development </td> 
<td> 2 Months </td>
</tr>
</table>

<h2 id="corner5"> Welcome to inline CSS </h2>
</body>
</html>

Output:


Example 4.
<!DOCTYPE html>
<html>
<head>
<style>
div.img {
    margin: 5px;
    padding: 5px;
    border: 1px solid #ff0000;
    height: auto;
    width: auto;
    float: left;
    text-align: center;
}   

div.img img {
    display: inline;
    margin: 5px;
    border: 1px solid #ffffff;
}

div.img a:hover img {
    border: 1px solid #0000ff;
}

div.desc {
  text-align: center;
  font-weight: normal;
  width: 120px;
  margin: 5px;
}
</style>
</head>
<body>
<h1> CSS Blocks </h1>
<div class="img">
 <a target="f3" href="wp2.html"><img src="ubuntu.png" width="110" height="90"></a>
 <div class="desc">Ubuntu, a description of the image here</div>
</div>

<div class="img">
 <a target="f3" href="wp3.html"><img src="solid.jpg" alt="Solid" width="110" height="90"></a>
 <div class="desc">Solid, a description of the image here</div>
</div>

<div class="img">
 <a target="f3" href="wp4.html"><img src="java-logo.jpg" alt="java" width="110" height="90"></a>
 <div class="desc">Java,  a description of the image here</div>
</div>

<div class="img">
 <a target="f3" href="wp5.html"><img src="web-design.jpg" alt="web" width="110" height="90"></a>
 <div class="desc">web, a description of the image here</div>
</div>

</body>
</html>
output:


Example 5. Table with CSS properties.
<html>
<head>
<style>
table, td, th {
    border: 5px solid blue;
color:black;
}

th {
    background-color: blue;
    color: white;
}
</style>
</head>

<body>
<table>
  <tr>
    <th>Firstname</th>
    <th>Lastname</th>
    <th>Address</th>
  </tr>
  <tr>
    <td>Ramu</td>
    <td>Gopi</td>
    <td>Mumbai</td>
  </tr>
  <tr>
    <td>Suman</td>
    <td>Rastogi</td>
    <td>Indore</td>
  </tr>
  <tr>
    <td>Kevin</td>
    <td>Saman</td>
    <td>Delhi</td>
  </tr>
</table>
</body>
</html>
output:


Click here for Javascript programs 

Java Programs - 2

1. Java program to find number of lines.
import java.io.*;

public class NOL
{
public static void main(String[] args) 
{
try
{
System.out.println("Getting line number of a paritcular file example!");
 BufferedReader bf = new BufferedReader(new InputStreamReader(System.in));
 System.out.println("Please enter file name with extension:");
   String str = bf.readLine();
   File file = new File(str);
   if (file.exists())
{
    FileReader fr = new FileReader(file);
   LineNumberReader ln = new LineNumberReader(fr);
  int count = 0;
  while (ln.readLine() != null){
 count++;
  }
  System.out.println("Total line no: " + count);
 ln.close();
  }
 else{
  System.out.println("File does not exists!");
  }
 }
 catch(IOException e){
 e.printStackTrace();
 }
 }
}

2. Java Program on method override.
class Base
{
void show()
{
System.out.println("inside the Base class method");
}
}

class Derive extends Base
{
void show()
{
System.out.println("inside the Dervied class method");
}
}

class Override
{
public static void main(String args[])
{
Derive d=new Derive();
d.show();
}
}

3. Java Program to print system time.
import java.util.*;
class Systime
{
public static void main(String args[])
{
Date d=new Date();
System.out.println(d.getHours() + ":"+ d.getMinutes() + ":" + d.getSeconds());
}
}

4. Java Program to demonstrate thread example.
class Ta extends Thread
{
public void run()
{
for(int i=1; i<=5; i++)
{
System.out.println("A thread=" + i);
}
System.out.println("Ta is over");
}
}

class Tb extends Thread
{
public void run()
{
for(int j=1; j<=5; j++)
{
System.out.println("B thread=" + j);
}
System.out.println("Tb is over");
}
}

class thread
{
public static void main(String args[])
{
Ta ta=new Ta();
ta.start();

Tb tb=new Tb();
tb.start();
}
}

5. Java Program without main().
class WithoutMain
{
static{
System.out.println("Hello world");
System.exit(0);
}
}

for more java program click here

Upload images to web server using php

The following example shows that how to upload and download images / files [.jpeg/.png/.bmp/ .txt/.doc etc] to web server [localhost or remote server] 

1. Create a HTML web page as following screen with code.
<html>
<head>
<title>Image/File Uploading Form</title>
</head>
<body background=bg.jpg>
<h2>File Upload:</h2>
Select a file to upload: <form action="file_uploader.php" method="post"  enctype="multipart/form-data">
<input type="file" name="file" size="50" /><br>
<input type="submit" value="Upload File" />
</form>
</body>
</html>


2. Next, create a  PHP file called "file_uploader.php" and add following code to in it.
<html>
<body background=bg.jpg>
<?php
$uploaddir = '/wamp/www/Demo/uploaded/';
$uploadfile = $uploaddir. basename($_FILES['file']['name']);

if (move_uploaded_file($_FILES['file']['tmp_name'], $uploadfile)) {
    echo "File is valid, and was successfully uploaded.\n";
} else {
    echo "Error in uploading files..!\n";
}
?>
<br><br>
<hr>
<a href="download.php">View Uploaded  files  </a>
<hr>
<br><br><br> <br><br><br><br><a href="home.php"> <img src="home-button-icon.png"> </a>
</body>
</html>

3. Click on "Choose File" button to browse and select file/image then click on upload.

4. Before running this page, create a folder called "uploaded" in the following location.
 /wamp/www/Demo/uploaded/ 

5. Now, Click on "Choose File" button to browse and select file/image then click on upload then it will show as following out put.

6. Now, to download the files from server / create a following PHP page for the same task.

7. Create File called  "download.php" and add following code to it.

<html>
<body background=bg.jpg>
<h1><font color=teal> Download files here </h1>
<hr>
<?php

$directory = 'uploaded'; 

echo "<table border=1 style='border:6px solid teal' cellpadding=5 cellspacing=6 align=center>";

foreach(glob($directory.'/*.*') as $file) 
{
echo "<tr>";
echo "<td>". $file . '-' . date ("m/d/Y", filemtime($file)). "</td>";
echo "<td>". '<a href="'.$file.'">'.$file.' - Size:'.filesize($file).'</a>'. "</td>";

echo "</tr>";
}
echo "</table>";
?>
<br><br><br> <br><br><br><br><a href="home.php"> <img src="home-button-icon.png"> </a>
</body>
</html>

8. Now run the above page to see below output and one can download any files from server.


That's all for now! 
keep browsing here for more on PHP image searching. 

Searching Images using PHP

To search images using PHP from MySQL Database, follow the examples.

First of all create a table in MySQL database with following fields.


Now, insert some images by clicking on "insert" tab in MySQL.


Now, create a HTML page as following tags.
<html>
<body>
<h1> Image searching.........</h1>
<form name=f1 action="image.php" method="GET">
Enter image Id: <input type=text name=t1>
<input type=submit value="Display"> 
</form>
</body>
</html>

After creating above HTML page, now create PHP config file with following code in it.[save as "config.php"] this file contains database name, user, password etc. 
<?php
      $host="localhost";
      $username="root";
      $password="";
      $dbname="mars_db";
      $con=mysql_connect("$host","$username","$password");
      mysql_select_db("$dbname",$con);
?>

Now create PHP file to search stored images in database.
Copy the following code and save as "image.php".
<?php
$key=$_GET['t1'];
include './config.php';
@mysql_connect($host, $username, $password) or die("Can not connect to database: ".mysql_error());

@mysql_select_db($dbname) or die("Can not select the database: ".mysql_error());

$query = mysql_query("SELECT * FROM photo WHERE pid=' ".$key."'");

$row = mysql_fetch_assoc($query);

$contents = $row['content'];

header("Content-type: image/jpg");
echo $contents;
?> 

Now, run HTML page as following.


Finally the output looks like this.


That's all for now!, Thank you for reading!
you can also refer other PHP examples here.

Simple Marks Calculation using Excel

This example shows a simple marks calculation using MS-Excel.

Here are the steps for calculating total, average, minimum and maximum marks.

1. First of all, create a sheet with following data in it.

2. Place cursor next to "Total Marks" column and type the formula [while writing a formula in excel it is mandatory to put "=" equal sign before the formula or name of the expression and refer the cell address with separated by ":" colon, which indicates starting cell address and ending cell address] as shown in following image.

3. After hitting enter key you can see the following output.

4. Now calculate Average. [follow below image]

5. Now, find minimum value in the range. [follow below image]

6. Do also for Maximum. [refer below image]

7. Now sheet looks completed with all 4 basic calculations- sum, average, minimum and maximum. [refer below screen shot]

8. The above data can be shown in Graphical way .i.e. using excel "Charts", just follow below steps.

8.a) First select all data as per following image.

8.b) Then go to "Insert" tab [follow below screen shots]

8.c) Now click on "Column" chart [ refer below image]

8.d) Now you can see the complete sheet with chart on marks details with following screen shot.

That's all for now, I'm coming with new Excel example in my next blog. Happy Reading!!


Data validation in Excel

Data Validation with MS - Excel

Data validation is an important for entering specific values in the column with size or length. Here are the steps.

1. Prepare the sheet as shown in following screen shot.

2. Select the cloumn "Employee code" then Go to "Data" menu tab in the excel.

3. Select Data validation.


4. Select "Settings" Tab and set the validation criteria as shown in below image.

5. Now go to "Input Message" Tab on Data validation dialog box and set Title and Input message as following.

6. Now go to "Error Alert" tab and set error style and title and also enter error message.

7. Now enter data, you see an input message as yellow shaded box next to cells.

8. If any violation in the data entry, you will see an error message box as following. [as we set criteria for Employee code min:4 and maximum:6 characters]

9.Also set other criteria for more columns by allowing specific values to be entered like date, time, number etc. 
That's all for now. subscribe here for tutorials.

you can also read my other blog on Excel

Clear Excel Sheet using VBA

To clear the entered data in the current sheet of MS-Excel application follow the below simple steps.

1. Click on " Developer" tab in MS-Excel as shown in below image.

2. Click on "insert" and select "command Button", follow image.

3. Drag the button on the sheet and right click on it, select properties->Caption->Enter text like "Empty Sheet" 

4. After inserting button, now right click on button->"View Code", enter following code in it.

Private Sub CommandButton1_Click()
Dim resp As Integer
resp = MsgBox("Are you sure you want to clear the sheet?", _
vbYesNo + vbQuestion, "Clear Sheet")
If resp = vbYes Then
    Cells.ClearContents
Else
  End If
End Sub

5. Now enter some data in the sheet, just refer below image.

6. Now, press F5 or Run the form or Click on "Empty Sheet" button and you'll see following image with confirm dialog box.

7. After pressing "Yes" button on the message box, all the data which was entered in the sheet is removed and sheet looks new! (see below image).

Note: To save your Macros for future use, please save as "Excel Macro-Enabled Workbook" in save as type drop down menu. 

 That's all for now! Happy reading! :) 

You can also visit my other Excel Examples on Macros

SPEED UP YOUR PC

To speed up your windows XP/7/8/8.1/8.2 PC, Just follow the below steps to make your PC running faster and reliable.

1. Defragment your hard drive: After accessing and storing lots of files on your computer hard drive it is common that files or folders get scattered in memory.  
Click->Start->Accessories->System tools->Disk Defragmenter [follow below image]

2. Uninstall unused program: It is better to uninstall unused applications or programs.[follow below steps with image]
Start->Settings->Control Panel->Add or Remove Programs->Select any application that you want to uninstall and click on "Remove" button.

3. Cleanup you disk: This enables us to clean hard drive and allows it to run faster.
Start->Programs->Accessories->System Tools->Disk Cleanup


4. Delete unused files: Delete unwanted files.

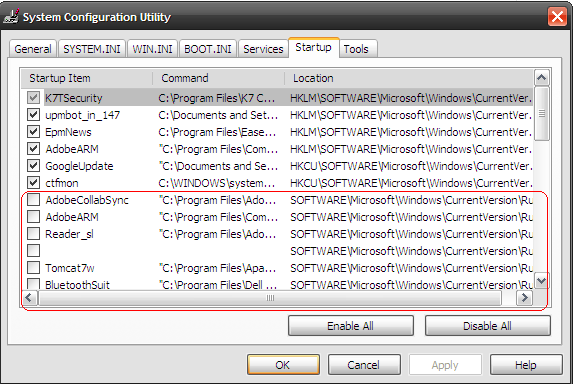
5. Remove programs from startup: These are the program which set themselves to start with windows operating system automatically when you start your machine every time. 
Start->Run->Type "MSCONFIG" -> Press Enter [see below image]

 6. Scan with Genuine Anti virus: It is better to scan your PC with genuine anti-virus to clean all viruses to make PC faster.  
Start->Select your Anti-virus and run Complete scan

7. Disable indexing: It is better to disable indexing on selected drive to make system faster. Here are the steps.
Double click on "Computer" icon ->Select any drive ->Right Click -> Properties-> uncheck "Allow indexing service...." 

8. Remove Log files : to remove log files,  follow below steps with screen image
Start->Run->then type “eventvwr” select "Application" click on clear all events and also perform same steps for "System" option.
  
9. Delete temp folder files: Start -> Run -> type “%temp% then press enter and select all temp files then press “shift+Del”.


That's all for now, Happy Reading!

Are you looking for academic projects on IT, Computer Science for BCA, Diploma, B.E., M.Tech, MCA and Management for BBM, MBA and PGDBM etc? Click here and you'll get complete project with all details. 

COBOL Programs

1. COBOL program on Arithmetic Operation 
      *PROGRAM TO PERFRM ARITHMATIC OPERATIONS USING COMPUTE VERB.
       IDENTIFICATION DIVISION.
       PROGRAM-ID. AOP.
       ENVIRONMENT DIVISION.
       DATA DIVISION.
       WORKING-STORAGE SECTION.
       01 A PIC 9(4).
       01 B PIC 9(4).
       01 SUM PIC 9(4).
       01 SUB PIC 9(4).
       01 MUL PIC 9(4).
       01 DIV PIC 9(4).99.
       PROCEDURE DIVISION.
       START-PARA.
           DISPLAY "ENTER THE VALUES OF A AND B".
           ACCEPT A.
           ACCEPT B.
           COMPUTE SUM = A + B.
           COMPUTE SUB = A - B.
           COMPUTE MUL = A * B.
           COMPUTE DIV = A / B.
           DISPLAY "SUM = ", SUM.
           DISPLAY "SUB = ", SUB.
           DISPLAY "MUL = ", MUL.
           DISPLAY "DIV = ", DIV.
           STOP RUN.
2. COBOL Program to display SUM and Average values
      *PROGRAM TO FIND SUM AND AVERAGE OF 6 NUMBERS.
       IDENTIFICATION DIVISION.
       PROGRAM-ID. SUM-AVG.
       ENVIRONMENT DIVISION.
       DATA DIVISION.
       WORKING-STORAGE SECTION.
       01 N1  PIC 9(4).
       01 N2  PIC 9(4).
       01 N3  PIC 9(4).
       01 N4  PIC 9(4).
       01 N5  PIC 9(4).
       01 N6  PIC 9(4).  
       01 SUM PIC 9(6).
       01 AVG PIC 9(4).99
       PROCEDURE DIVISION.
       START-PARA.
           DISPLAY "ENTER VALUES FOR 6 NUMBERS".
           ACCEPT N1.
           ACCEPT N2.
           ACCEPT N3.
           ACCEPT N4.
           ACCEPT N5.
           ACCEPT N6.
           COMPUTE SUM = N1 + N2 + N3 + N4 + N5 + N6.
           COMPUTE AVG = SUM / 6.
           DISPLAY "SUM      = ", SUM.
           DISPLAY "AVERAGE  = ", AVG.
           STOP RUN.
3. COBOL Program to find Largest of Two Numbers
      *PROGRAM TO FIND LARGEST OF 2 NUMBERS.
       IDENTIFICATION DIVISION.
       PROGRAM-ID. LARGEST2.
       ENVIRONMENT DIVISION.
       DATA DIVISION.
       WORKING-STORAGE SECTION.
       01 A  PIC 9(4).
       01 B  PIC 9(4).
       PROCEDURE DIVISION.
       START-PARA.
           DISPLAY "ENTER THE VALUE OF A AND B".
           ACCEPT A.
           ACCEPT B.
           IF A > B
           DISPLAY "A IS LARGEST",
           ELSE
           DISPLAY "B IS LARGEST.
           STOP RUN.
4. COBOL Program to display Largest of 3 Numbers
      *PROGRAM TO LARGEST OF 3 NUMBERS.
       IDENTIFICATION DIVISION.
       PROGRAM-ID. LARGE3.
       ENVIRONMENT DIVISION.
       DATA DIVISION.
       WORKING-STORAGE SECTION.
       01 A PIC 9(4).
       01 B PIC 9(4).
       01 C PIC 9(4).
       PROCEDURE DIVISION.
       START-PARA.
           DISPLAY " ENTER A ".
           ACCEPT A.
           DISPLAY " ENTER B ".
           ACCEPT B.
           DISPLAY " ENTER C ".
           ACCEPT C.
           IF ( A > B )
           DISPLAY " A IS LARGEST ",
           ELSE IF ( B > C )
           DISPLAY " B IS LARGEST ",
           ELSE
           DISPLAY " C IS LARGEST ".
           STOP RUN.
5. COBOL Program to calculate Simple Interest
      *PROGRAM TO FIND SIMPLE INTEREST.
       IDENTIFICATION DIVISION.
       PROGRAM-ID. SI.
       ENVIRONMENT DIVISION.
       DATA DIVISION.
       WORKING-STORAGE SECTION.
       01 P PIC 9(4).
       01 T PIC 9(4).
       01 R PIC 9(4).
       01 SI PIC 9(4).99.
       PROCEDURE DIVISION.
       START-PARA.
           DISPLAY "ENTER PRINCIPLE AMOUNT : P".
           ACCEPT P.
           DISPLAY "ENTER TIME PERIOD : T".
           ACCEPT T.
           DISPLAY "ENTER RATE OF INTEREST : R".
           ACCEPT R.
           COMPUTE SI = P * T * R / 100.
           DISPLAY "SIMPLE INTEREST = ", SI.
           STOP RUN.
6. COBOL program to calculate Compound Interest
      *PROGRAM TO CALCUTE COMPOUND INTEREST.
       IDENTIFICATION DIVISION.
       PROGRAM-ID. CI.
       ENVIRONMENT DIVISION.
       DATA DIVISION.
       WORKING-STORAGE SECTION.
       01 P PIC 9(4).
       01 R PIC 9(4).
       01 N PIC 9(4).
       01 CI PIC 9(5).99.
       PROCEDURE DIVISION.
       START-PARA.
           DISPLAY "ENTER PRINCIPLE AMOUNT : P".
           ACCEPT P.
           DISPLAY "ENTER RATE OF INTEREST : R".
           ACCEPT R.
           DISPLAY "ENTER PERIOD OF LOAN : N ".
           ACCEPT N.
           COMPUTE CI = P * ( 1 + R / 100 ) ** N - P.
           DISPLAY "COMPOUND INTEREST = ", CI.
           STOP RUN.
7. COBOL Program to find the entered number is EVEN or ODD.
      *PROGRAM TO FIND NUMBER IS EVEN 0R ODD.
       IDENTIFICATION DIVISION.
       PROGRAM-ID. EVEN-ODD.
       ENVIRONMENT DIVISION.
       DATA DIVISION.
       WORKING-STORAGE SECTION.
       01 N PIC 9(4).
       01 REM PIC 9(4).
       PROCEDURE DIVISION.
       START-PARA.
           DISPLAY "ENTER NUMBER".
           ACCEPT N.
           DIVIDE N BY 2 GIVING N REMAINDER REM. 
           IF REM = 0
           DISPLAY " NUMBER IS EVEN ",
           ELSE
           DISPLAY " NUMBER IS ODD".
           STOP RUN.

8. COBOL Program to REVERSE the entered Number.
        IDENTIFICATION DIVISION.
        PROGRAM-ID. REV.
        ENVIRONMENT DIVISION.
        DATA DIVISION.
        WORKING-STORAGE SECTION.
        01 N PIC 9(6).
        01 REM PIC 9(4).
        01 REV PIC 9(6) value 0.
        PROCEDURE DIVISION.
        START-PARA.
              DISPLAY " ENTER THE NUMBER TO BE REVERSED ".
              ACCEPT N.
              PERFORM REV-PARA UNTIL N = 0.
              DISPLAY " REVERSED NUMBER = ", REV.
              STOP RUN.
        REV-PARA.
              DIVIDE N BY 10 GIVING N REMAINDER REM.
              COMPUTE REV = REV * 10 + REM.

9. COBOL Program to display Multiplication Table of Entered Number.
        IDENTIFICATION DIVISION.
        PROGRAM-ID. MTAB.
        ENVIRONMENT DIVISION.
        DATA DIVISION.
        WORKING-STORAGE SECTION.
        01 N PIC 9(2).
        01 I PIC 9(2) VALUE 0.
        01 P PIC 9(4).
        PROCEDURE DIVISION.
        START-PARA.
           DISPLAY " ENTER THE NUMBER ".
           ACCEPT N.
           PERFORM MUL-PARA 10 TIMES.
           STOP RUN.
        MUL-PARA.
           ADD 1 TO I.
           COMPUTE P = N * I.
           DISPLAY N " * " I " = " P.

10. COBOL Program to SWAP Two Numbers.
      *PROGRAM TO SWAP TWO NUMBERS.
       IDENTIFICATION DIVISION.
       PROGRAM-ID. SWAP.
       ENVIRONMENT DIVISION.
       DATA DIVISION.
       WORKING-STORAGE SECTION.
       01 A PIC 9(2).
       01 B PIC 9(2).
       PROCEDURE DIVISION.
       START-PARA.
           DISPLAY " ENTER THE VALUE OF A & B ".
           ACCEPT A.
           ACCEPT B.
           DISPLAY " THE VALUE OF A BEFORE SWAPPING ", A.
           DISPLAY " THE VALUE OF B BEFORE SWAPPING ", B.
           COMPUTE A = A + B.
           COMPUTE B = A - B.
           COMPUTE A = A - B.
           DISPLAY "-------------------------------".
           DISPLAY " THE VALUE OF A AFTER SWAPPING ", A.
           DISPLAY " THE VALUE OF B AFTER SWAPPING ", B.
           STOP RUN.

11. COBOL Program to find SUM of N Numbers.
      *PROGRAM TO FIND SUM OF N NUMBER.
       IDENTIFICATION DIVISION.
       PROGRAM-ID. SUM-OF-N.
       AUTHOR. MIT.
       ENVIRONMENT DIVISION.
       DATA DIVISION.
       WORKING-STORAGE SECTION.
       01 N    PIC 9(3).
       01 SUM  PIC 9(6) VALUE IS 0.
       PROCEDURE DIVISION.
       START-PARA.
           DISPLAY "PROGRAM TO FIND SUM OF N NUMBERS".
           DISPLAY "ENTER THE RANGE".
           ACCEPT N.
           PERFORM SUM-PARA N TIMES.
           DISPLAY " SUM = ", SUM.
           STOP RUN.
       SUM-PARA.
           COMPUTE SUM = SUM + N.
           COMPUTE N = N - 1.

12. COBOL program to find Factorial of Given Number.
       Identification division.
       Program-id. Fact.
       Author. MIT.
       Environment division.
       Data division.
       Working-storage section.
       01 n pic 9(3).
       01 x pic 9(8) value 1.
       01 i pic 99.
       procedure division.
       Start-para.
            display "Enter the no whose factorial is to calculated :".
            accept n.
            perform para-1  varying i from 1  by 1 until  i > n.
                display "The factorial of " n " is " x.
                stop run.
       para-1.
                compute  x  =  x  * i.