Google search

Basic and advanced computer skills like Excel with macros, How to speed up your PC, C, CPP, Java programming, HTML, JavaScript, PHP, Wordpress, all web tools, Android tutorials, MySQL Tutorials, WAMP server installation. etc.

Creating an Excel form with Macros

This tutorial teaches you how to create an excel forms with Macros with step-by-step approaches. 

Step1 :  Open MS Excel Application and then click on “Developer” Tab  then click on “Visual Basic” option as shown in following screen shots. 


Step2: Click on “Insert” menu then select “UserForm” as shown in below image


Step3: Drag and drop the controls on the form (in this example:  3 Labels, 3 Text Boxes and 2 Buttons and set properties for Label1 to “Enter Product Name”, Label2 to “Enter Qty”, Label3 to “Enter Product Price”, Button1 to “AddNew Record” and Button2 to “Reset” in “Caption” under properties dialog box) follow below image.


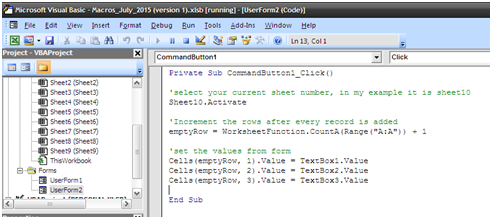
Step4: Now, Double click on “AddNew Record” button to write some code for inserting records to current sheet. Follow below screen image


Step 5: Now, test the form by running it, click on Green Forward arrow symbol or by pressing function key “F5” (see below image)


Step 6: You’ll see following output after pressing F5 or clicking on green forward arrow


Step 7: Enter a record as following and hit the “AddNew Record” Button. After this, one record is added to the sheet (sheet10 in this example)


Step8: Now close the form by clicking on “X” it will take you to the design mode. And enter some code for “Reset” button for resetting all values. Follow below image. [double click on “Reset” button and add following code]


Step9:  To call the User Form, which is created now, insert a button in the current sheet. [go to “Developer” tab and click -> Insert -> Command Button, drag on the sheet.   Follow below image.


Step 10: Right click on “ User Form” button and select “View Code”


Step 11: Enter following a line of code in it. Follow below image.


Step12: Now Click back on “Design Mode” to enable “User Form” button functioning, Click on “User Form” button and you’ll see following screen. [now start entering list of records] 


Step 13: Enter few more record by clicking on “AddNew Record” button and “Reset” for clearing all values.


That’s all for now! I’m coming with new Macro example in next blog.

Macros in Excel

A macro can be defined as the recording of a series of tasks. It’s the simplest form of automation – show a software program the steps you follow to get something done, and the software will follow along. When used right, macros can save you hours by automating simple, repetitive tasks.

A macro is a series of commands and functions that are stored in a Microsoft Visual Basic module (module: A collection of declarations, statements, and procedures stored together as one named unit. And can be run whenever you need to perform the task. 

For example, if you often enter long text strings in cells, you can create a macro to format those cells so that the text wraps. 

Recording macros When you record a macro, Excel stores information about each step you take as you perform a series of commands. You then run the macro to repeat, or "play back," the commands. If you make a mistake when you record the macro, corrections you make are also recorded. Visual Basic (Visual Basic: A high-level, visual-programming version of Basic. Visual Basic was developed by Microsoft for building Windows-based applications.) stores each macro in a new module attached to a workbook. 

To Create a Macro, Follow simple steps.
1. Start the MS Excel Application
2. Go to "Developer" Tab Menu 
3. Click "Record Macro" Button (follow screen shot) 
4. Save the macro as following screen shot.

5. After saving, Now Start typing some content as following.

6. After typing all records as shown in above image, now again go to "Developer"Tab and click on "Stop Recording" as shown in above image as well.

7. Save the work book as "Excel Macro Enabled Work Book" under "Save as Type" for future use of this macro example. (follow below screen shot image)

8. Now, Go to Sheet2 in the same work book and add a CommandButton (see below image)


9. Now, right click on Button, then select "View Code" (follow below image)


10. This will open next window as following and type following code in it to call newly created macro (refer below image)


11. Now click on "Call Macro" button to run the macro to fill all records in new sheet from existing macro.


That's all!

Next : Macros with Forms