Google search

Basic and advanced computer skills like Excel with macros, How to speed up your PC, C, CPP, Java programming, HTML, JavaScript, PHP, Wordpress, all web tools, Android tutorials, MySQL Tutorials, WAMP server installation. etc.

Fill values in combo box from MySQL using PHP

The below example shows that How to fill values in second combo box based on first combo box selected values from MySQL DB using PHP

1 Create a table called "Course" as following screen shot with insert few records as well in it.


2. Create another table called "Subjects" and add few records as following.


3. Now create "config.php" with following code in it.
<?php
      $host="localhost";
      $username="root";
      $password="";
      $dbname="demo";
      $con=mysql_connect("$host","$username","$password");
      mysql_select_db("$dbname",$con);
?>

In the above code please enter your database name, user name, password etc. 

4. Now create "cmb5.php" program with following code in it.
<?php
include('config.php');
?>
<html>
<head>
<script language="javascript">
    function showSub(catid)
 {
 document.frm.submit();
 }
</script>
</head>
<body>
<h2> Fill values in second combo box based on </br> first 

combo box values from MySQL DB using PHP </h2>
<hr color=red>
<?php error_reporting (E_ALL ^ E_NOTICE); ?>
<form action="" method="POST" name="frm" id="frm">
<table width="500" border="0">
  <tr bgcolor=silver>
    <td>Course</td>
    <td> <select name="course_id" id="course_id" 

onChange="showSub(this.value);">
       <option value="">--Select--</option>
       <?php
        $sql1="select * from course";
       $sql_row1=mysql_query($sql1);
       while($sql_res1=mysql_fetch_assoc($sql_row1))
       {
       ?>
       <option value="<?php echo $sql_res1["id"]; ?>" 

<?php if($sql_res1["id"]==$_REQUEST["course_id"]) { 

echo "Selected"; } ?>><?php echo 

$sql_res1["course_name"]; ?></option>
        <?php
        }
        ?>
       </select>
       </td>
  </tr>
  <tr bgcolor=silver>
    <td>Subjects</td>
    <td>
       <select name="sub_id" id="sub_id">
        <option value="">--Select--</option>
       <?php
       $sql="select * from subjects where 

cat_id='$_REQUEST[course_id]'";
       $sql_row=mysql_query($sql);
       while($sql_res=mysql_fetch_assoc($sql_row))
       {
       ?>
       <option value="<?php echo $sql_res["id"]; 

?>"><?php echo $sql_res["Sub"]; ?></option>
       <?php
       }
       ?>
    </select>
       </td>
  </tr>
</table>
</form>
</body>
</html>

5. Finally go for out put to see the above program. 


That's all for now, kindly subscribe us / comments your response!.

Thank you!


PHP-Pagination Example

The below example shows that how to retrieve records from MySQL Database using PHP Pagination technique. 

In the below example i included image along with text information. For image and text storing and retrieving you can click here and refer the same.

First of all create a php file called "pagination2.php" with following code in it. 
<html>
<head>
<title>Members Information Pagewise</title>
</head>
<body bgcolor=khaki>
<h1 align=center>Members Information Pagewise</h1>
<hr color=green>
<?php
$con = mysqli_connect('localhost','root','','demo');
//per page records
$per_page=1;
if (isset($_GET["page"])) {
$page = $_GET["page"];
}

else {
$page=1;
}

$start_from = ($page-1) * $per_page;

//Selecting the data from table with LIMIT
$query = "SELECT * FROM members2 LIMIT $start_from, 

$per_page";
$result = mysqli_query ($con, $query);
?>

<table align="center" border="1" cellpadding="4" 

cellspacing="4">
<tr bgcolor=white><th>Members 

Name</th><th>Qualification</th><th>Photo</th></tr>

<?php
while ($row = mysqli_fetch_assoc($result)) {
?>
<tr align="center" bgcolor=skyblue>
<td><?php echo $row['memname']; ?></td>
<td><?php echo $row['qual']; ?></td>
<td> <?php echo "<img src='uploaded/".$row['photo']."' 

height=100 width=100 />" ?> 

</tr>

<?php
};
?>
</table>

<div>
<?php

//select all records from members2 table in this example
$query = "select * from members2";
$result = mysqli_query($con, $query);

// Count the total records present in the table
$total_records = mysqli_num_rows($result);

//Function ceil to divide the total records on per page
$total_pages = ceil($total_records / $per_page);

//Lets go to first page , here you can use icons or text to 

give hyperlinks
echo "<center><a href='pagination2.php?page=1'>".'<img 

src=back.ico>'."</a>";

for ($i=1; $i<=$total_pages; $i++) {
echo "<a href='pagination2.php?page=".$i."'>".$i."</a> ";
};
// Lets move to last page
echo "<a 

href='pagination2.php?page=$total_pages'>".'<img 

src=next.ico>'."</a></center>";
?>
<hr color=green>
</div>
</body>
</html>

The output of the above program would produce following image.


Insert Image at server and data in to mysql database

This example shows you that how to insert an image to server (localhost) and its path and file name to database along with other text information using php script and mysql database.

Before we begin into programming, let's create a folder called "uploaded" at "wamp/www/your-web-directory" and it should appear like "wamp/www/your-web-directory/uploaded".

After creating folder, now go to mysql database and create a database called "demo" and table called "members2" with these columns and types in it. 

Table Name:  members2
Field names : memname, qual, photo, addrs, email.
Note. All field types should be varchar type and length you can set approximately 100 for each column.

The table should look as following screen shot.


Now create an HTML file for user to insert image with text. follow below example(addMem2.html).

1. addMem2.html
<html>
<body bgcolor=khaki>
<h1 align=center> Enter member information </h1>
 <form method="post" action="addMem2.php" enctype="multipart/form-data">
   <hr>
<center> 
<table border=1 cellpadding=8 cellspacing=8>
<tr>
<td> Enter Members Name: </td> <td> <input type="text" name="memname"/> </td> </tr>

<tr>
<td> Please Enter Qualification: </td> <td> <input type="text" name="qual"/> </td> </tr>

<tr>
<td> Select Photo: </td> <td>  <input type="hidden" name="size" value="350000">  <input type="file" name="photo"> <p> Less than 350KB only </p> </td> </tr> 

<tr>
<td> Address </td> <td><textarea rows="5" cols="35" name="addrs"> </textarea>   </td> </tr>

<tr>
<td>Email ID: </td> <td> <input type="text" name="email" size=30 />  </td> </tr>

<tr>
<td> <input TYPE="reset" name="can"  value="Reset"/> </td> 

<td> <input TYPE="submit" name="upload" title="Add Members Details" value="Add Member"/> </td>
</tr> </table>
</form>
</body>
</html>

output of the above page is as following..


2. Now create a file called "addMem2.php" (follow below code)
<?php
$target = '/wamp/www/advancedPHP/Uploaded/';
$target = $target . basename( $_FILES['photo']['name']);

$mname=$_POST['memname'];
$mqual=$_POST['qual'];
$mpic=(mysql_real_escape_string($_FILES['photo']['name']

));
$maddrs=$_POST['addrs'];
$memail=$_POST['email'];

$connection = mysqli_connect("localhost","root","");
if (!$connection) {
   die("Database connection failed: " . 

mysqli_connect_error());
}

$db_select = mysqli_select_db($connection, "demo");
if (!$db_select) {
die("Database selection failed: " . mysqli_connect_error());
}

// Entering information to the database
mysqli_query($connection,"INSERT INTO 

members2(memname,qual,photo,addrs,email) VALUES 

('$mname','$mqual','$mpic','$maddrs','$memail')") ;
// Stores the photo at server location
if(move_uploaded_file($_FILES['photo']['tmp_name'], 

$target))
{

// confirms you all is correct!
echo "<h1 align=center><font color=green>The Image ". 

basename( $_FILES['photo']['name']). " has been uploaded, 

and your information has been stored to the database. 

Thank you! </font> </h1>";
}
else {

echo "<h1 align=center><font color=red>Sorry, there was 

a problem uploading your file.</font> </h1>";
}
echo "<a href=show_mem.php> Show All Members </a>";
?> 

out put of the above php page is as following...
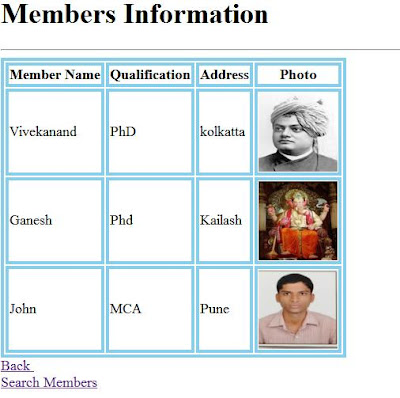
3. Now create one more page called "show_mem.php" with following code in it.
<html>
<head>
<style>
table, td, th {
    border: 4px solid skyblue;
}
</style>
</head>

<body background=bg.jpg>

<?php
$con=mysql_connect("localhost", "root", "");

if(!$con)
{
die('Couldnt connect to database:'.mysql_error());
}

mysql_select_db("demo", $con);

$result=mysql_query("select * from members2");

echo "<h1> Members Information </h1>";
echo "<hr>"; 
echo "<table border=1>";
echo "<tr>";
echo "<th> Member Name </th>";
echo "<th> Qualification </th>";
echo "<th> Address </th>";
echo "<th> Photo </th>";
echo "</tr>";

while($row=mysql_fetch_array($result))
{
echo "<tr>";
echo "<td>" .$row['memname']. "</td>";
echo "<td>" .$row['qual']. "</td>";
echo "<td>" .$row['addrs']. "</td>";
echo "<td>";
echo "<img src='uploaded/".$row['photo']."' height=100 width=100 />" ;
echo "</td>";
echo "</tr>";
}
echo "</table>";
mysql_close($con);
echo "<a href=addMem2.html>Back </a><br>";
echo "<a href=search_mem.html>Search Members </a>";
?>
</body>
</html>

output of the above program is...
Thank you for referring this example. Please leave your valuable feedback to improve my further blogs. 
Finally, don't forget to subscribe this site!!!..