Google search

Basic and advanced computer skills like Excel with macros, How to speed up your PC, C, CPP, Java programming, HTML, JavaScript, PHP, Wordpress, all web tools, Android tutorials, MySQL Tutorials, WAMP server installation. etc.
Showing posts with label php. Show all posts

Inserting radio button value to mysql database through php script

In the below example shows that  "Inserting radio button value to mysql database through php script"  

Before we begin let us understand brief about radio buttons, radio buttons are used to select single value from a group or it is for single selection or true / false type of values. 

Step 1 : Create table as following screen shot in MySql database with all fields set to varchar type.


Step 2 : Create a configuration file for connection purpose as following and name it config2.php (as per my example)
<?php
      $host="localhost";
      $username="root";
      $password="";
      $dbname="demo";
      $con=mysql_connect("$host","$username","$password");
      mysql_select_db("$dbname",$con);
?>

Step 3:  Create main html/php page to display radio buttons and name it "radio2mysql.php" and follow the below code.


<html>
<head> 
</head> 
<body>
<center>
<table style="border: 1px solid yellowgreen;">
 <h2>Inserting Radio button value to MySQL database in 
php</h2>
 <form method="post" action="">
<tr> 
<td> Register No: </td> <td> <input type=text 
name=t1> </td> </tr>
<tr><td>  <input type="radio" name="status" 
value="Booked">Booked 
 <input type="radio" name="status" 
value="Pending">Pending </td> </tr>
<tr> <td> 
<input type="submit" name="submit" Value="submit"> 
</td> </tr> </table>
 </form>
 </body>
</html>
<?php error_reporting (E_ALL ^ E_NOTICE); ?>
<?php
include 'config2.php';
$t1=$_POST['t1'];
$st=$_POST['status'];
$query=mysql_query("select * from booked_status where 
regno='".$t1."' ") or die(mysql_error());
$duplicate=mysql_num_rows($query);
if (isset($_POST['submit']))
{
if($duplicate==0)
   {
$query = "INSERT INTO booked_status (regno, status) 
VALUES ('$t1','$st')";
mysql_query($query) or die(mysql_error());
echo "<center><h2 style='background-color:green; 
color:white; display:inline'><span>Successfully 
updated.</span>";
 }
 else
    {
      echo "<center><h2 style='background-color:red; 
color:white; display:inline'><span>The Register No. '$t1' is 
already present in the booking table";
    }
}
?>

Step 4: Output of the above program is...


Step 5: After successful submit with register number and radio button value following output can be generated. 

Step 6 : After unsuccessful submit with register number and radio button value following output can be generated(duplicate values). 

Thank you for referring above example! 

Fill values in combo box from MySQL using PHP

The below example shows that How to fill values in second combo box based on first combo box selected values from MySQL DB using PHP

1 Create a table called "Course" as following screen shot with insert few records as well in it.


2. Create another table called "Subjects" and add few records as following.


3. Now create "config.php" with following code in it.
<?php
      $host="localhost";
      $username="root";
      $password="";
      $dbname="demo";
      $con=mysql_connect("$host","$username","$password");
      mysql_select_db("$dbname",$con);
?>

In the above code please enter your database name, user name, password etc. 

4. Now create "cmb5.php" program with following code in it.
<?php
include('config.php');
?>
<html>
<head>
<script language="javascript">
    function showSub(catid)
 {
 document.frm.submit();
 }
</script>
</head>
<body>
<h2> Fill values in second combo box based on </br> first 

combo box values from MySQL DB using PHP </h2>
<hr color=red>
<?php error_reporting (E_ALL ^ E_NOTICE); ?>
<form action="" method="POST" name="frm" id="frm">
<table width="500" border="0">
  <tr bgcolor=silver>
    <td>Course</td>
    <td> <select name="course_id" id="course_id" 

onChange="showSub(this.value);">
       <option value="">--Select--</option>
       <?php
        $sql1="select * from course";
       $sql_row1=mysql_query($sql1);
       while($sql_res1=mysql_fetch_assoc($sql_row1))
       {
       ?>
       <option value="<?php echo $sql_res1["id"]; ?>" 

<?php if($sql_res1["id"]==$_REQUEST["course_id"]) { 

echo "Selected"; } ?>><?php echo 

$sql_res1["course_name"]; ?></option>
        <?php
        }
        ?>
       </select>
       </td>
  </tr>
  <tr bgcolor=silver>
    <td>Subjects</td>
    <td>
       <select name="sub_id" id="sub_id">
        <option value="">--Select--</option>
       <?php
       $sql="select * from subjects where 

cat_id='$_REQUEST[course_id]'";
       $sql_row=mysql_query($sql);
       while($sql_res=mysql_fetch_assoc($sql_row))
       {
       ?>
       <option value="<?php echo $sql_res["id"]; 

?>"><?php echo $sql_res["Sub"]; ?></option>
       <?php
       }
       ?>
    </select>
       </td>
  </tr>
</table>
</form>
</body>
</html>

5. Finally go for out put to see the above program. 


That's all for now, kindly subscribe us / comments your response!.

Thank you!


PHP-Pagination Example

The below example shows that how to retrieve records from MySQL Database using PHP Pagination technique. 

In the below example i included image along with text information. For image and text storing and retrieving you can click here and refer the same.

First of all create a php file called "pagination2.php" with following code in it. 
<html>
<head>
<title>Members Information Pagewise</title>
</head>
<body bgcolor=khaki>
<h1 align=center>Members Information Pagewise</h1>
<hr color=green>
<?php
$con = mysqli_connect('localhost','root','','demo');
//per page records
$per_page=1;
if (isset($_GET["page"])) {
$page = $_GET["page"];
}

else {
$page=1;
}

$start_from = ($page-1) * $per_page;

//Selecting the data from table with LIMIT
$query = "SELECT * FROM members2 LIMIT $start_from, 

$per_page";
$result = mysqli_query ($con, $query);
?>

<table align="center" border="1" cellpadding="4" 

cellspacing="4">
<tr bgcolor=white><th>Members 

Name</th><th>Qualification</th><th>Photo</th></tr>

<?php
while ($row = mysqli_fetch_assoc($result)) {
?>
<tr align="center" bgcolor=skyblue>
<td><?php echo $row['memname']; ?></td>
<td><?php echo $row['qual']; ?></td>
<td> <?php echo "<img src='uploaded/".$row['photo']."' 

height=100 width=100 />" ?> 

</tr>

<?php
};
?>
</table>

<div>
<?php

//select all records from members2 table in this example
$query = "select * from members2";
$result = mysqli_query($con, $query);

// Count the total records present in the table
$total_records = mysqli_num_rows($result);

//Function ceil to divide the total records on per page
$total_pages = ceil($total_records / $per_page);

//Lets go to first page , here you can use icons or text to 

give hyperlinks
echo "<center><a href='pagination2.php?page=1'>".'<img 

src=back.ico>'."</a>";

for ($i=1; $i<=$total_pages; $i++) {
echo "<a href='pagination2.php?page=".$i."'>".$i."</a> ";
};
// Lets move to last page
echo "<a 

href='pagination2.php?page=$total_pages'>".'<img 

src=next.ico>'."</a></center>";
?>
<hr color=green>
</div>
</body>
</html>

The output of the above program would produce following image.


Insert Image at server and data in to mysql database

This example shows you that how to insert an image to server (localhost) and its path and file name to database along with other text information using php script and mysql database.

Before we begin into programming, let's create a folder called "uploaded" at "wamp/www/your-web-directory" and it should appear like "wamp/www/your-web-directory/uploaded".

After creating folder, now go to mysql database and create a database called "demo" and table called "members2" with these columns and types in it. 

Table Name:  members2
Field names : memname, qual, photo, addrs, email.
Note. All field types should be varchar type and length you can set approximately 100 for each column.

The table should look as following screen shot.


Now create an HTML file for user to insert image with text. follow below example(addMem2.html).

1. addMem2.html
<html>
<body bgcolor=khaki>
<h1 align=center> Enter member information </h1>
 <form method="post" action="addMem2.php" enctype="multipart/form-data">
   <hr>
<center> 
<table border=1 cellpadding=8 cellspacing=8>
<tr>
<td> Enter Members Name: </td> <td> <input type="text" name="memname"/> </td> </tr>

<tr>
<td> Please Enter Qualification: </td> <td> <input type="text" name="qual"/> </td> </tr>

<tr>
<td> Select Photo: </td> <td>  <input type="hidden" name="size" value="350000">  <input type="file" name="photo"> <p> Less than 350KB only </p> </td> </tr> 

<tr>
<td> Address </td> <td><textarea rows="5" cols="35" name="addrs"> </textarea>   </td> </tr>

<tr>
<td>Email ID: </td> <td> <input type="text" name="email" size=30 />  </td> </tr>

<tr>
<td> <input TYPE="reset" name="can"  value="Reset"/> </td> 

<td> <input TYPE="submit" name="upload" title="Add Members Details" value="Add Member"/> </td>
</tr> </table>
</form>
</body>
</html>

output of the above page is as following..


2. Now create a file called "addMem2.php" (follow below code)
<?php
$target = '/wamp/www/advancedPHP/Uploaded/';
$target = $target . basename( $_FILES['photo']['name']);

$mname=$_POST['memname'];
$mqual=$_POST['qual'];
$mpic=(mysql_real_escape_string($_FILES['photo']['name']

));
$maddrs=$_POST['addrs'];
$memail=$_POST['email'];

$connection = mysqli_connect("localhost","root","");
if (!$connection) {
   die("Database connection failed: " . 

mysqli_connect_error());
}

$db_select = mysqli_select_db($connection, "demo");
if (!$db_select) {
die("Database selection failed: " . mysqli_connect_error());
}

// Entering information to the database
mysqli_query($connection,"INSERT INTO 

members2(memname,qual,photo,addrs,email) VALUES 

('$mname','$mqual','$mpic','$maddrs','$memail')") ;
// Stores the photo at server location
if(move_uploaded_file($_FILES['photo']['tmp_name'], 

$target))
{

// confirms you all is correct!
echo "<h1 align=center><font color=green>The Image ". 

basename( $_FILES['photo']['name']). " has been uploaded, 

and your information has been stored to the database. 

Thank you! </font> </h1>";
}
else {

echo "<h1 align=center><font color=red>Sorry, there was 

a problem uploading your file.</font> </h1>";
}
echo "<a href=show_mem.php> Show All Members </a>";
?> 

out put of the above php page is as following...
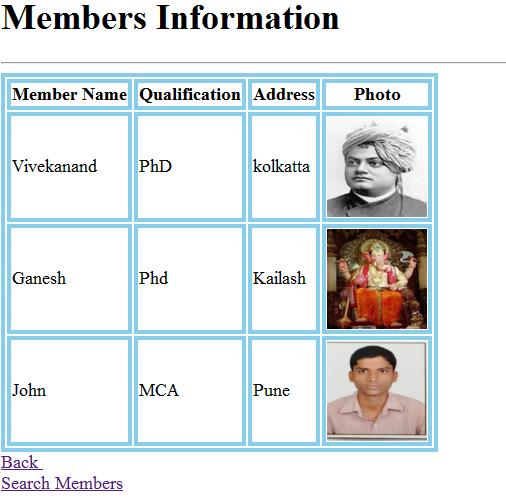
3. Now create one more page called "show_mem.php" with following code in it.
<html>
<head>
<style>
table, td, th {
    border: 4px solid skyblue;
}
</style>
</head>

<body background=bg.jpg>

<?php
$con=mysql_connect("localhost", "root", "");

if(!$con)
{
die('Couldnt connect to database:'.mysql_error());
}

mysql_select_db("demo", $con);

$result=mysql_query("select * from members2");

echo "<h1> Members Information </h1>";
echo "<hr>"; 
echo "<table border=1>";
echo "<tr>";
echo "<th> Member Name </th>";
echo "<th> Qualification </th>";
echo "<th> Address </th>";
echo "<th> Photo </th>";
echo "</tr>";

while($row=mysql_fetch_array($result))
{
echo "<tr>";
echo "<td>" .$row['memname']. "</td>";
echo "<td>" .$row['qual']. "</td>";
echo "<td>" .$row['addrs']. "</td>";
echo "<td>";
echo "<img src='uploaded/".$row['photo']."' height=100 width=100 />" ;
echo "</td>";
echo "</tr>";
}
echo "</table>";
mysql_close($con);
echo "<a href=addMem2.html>Back </a><br>";
echo "<a href=search_mem.html>Search Members </a>";
?>
</body>
</html>

output of the above program is...
Thank you for referring this example. Please leave your valuable feedback to improve my further blogs. 
Finally, don't forget to subscribe this site!!!..

Display and Update records using PHP

In this tutorials you'll able to List / Display records and Update records using PHP program with MySQL as a back-end database. 

First of all we will display list of all records entered into MySQL database using PHP page. Here is the code for that.

1. File name : list_records.php
<?php
$host="localhost"; 
$username="root";
$password=""; 
$db_name="mars_db"; 
$tbl_name="list"; 

mysql_connect("$host", "$username", "$password")or die("cannot connect"); 
mysql_select_db("$db_name")or die("cannot select DB");

$sql="SELECT * FROM $tbl_name";
$result=mysql_query($sql);
?>

<h1> Update records </h1> <hr color="yellow">
<table width="400" border="0" cellspacing="1" cellpadding="0">
<tr>
<td>
<table width="400" border="1" cellspacing="0" cellpadding="3">
<tr>
<td colspan="4"><strong>List of Employee Records </strong> </td>
</tr>

<tr>
<td align="center"><strong>ID</strong></td>
<td align="center"><strong>First name</strong></td>
<td align="center"><strong>Last Name</strong></td>
<td align="center"><strong>Update</strong></td>
</tr>

<?php
while($rows=mysql_fetch_array($result)){
?>

<tr>
<td><?php echo $rows['id']; ?></td>
<td><?php echo $rows['fname']; ?></td>
<td><?php echo $rows['lname']; ?></td>


<td align="center"><a href="update.php?id=<?php echo $rows['id']; ?>">update</a></td>
</tr>

<?php
}
?>

</table>
</td>
</tr>
</table>

<?php
mysql_close();
?>
<img src=icons/k.png>
<img src=icons/b.png>
<img src=icons/y.png>

2. Out put from above code looks as following.


3. Now, copy the below code and save as "update.php".
<?php
$host="localhost"; 
$username="root";
$password=""; 
$db_name="mars_db"; 
$tbl_name="list"; 

mysql_connect("$host", "$username", "$password")or die("cannot connect"); 
mysql_select_db("$db_name")or die("cannot select DB");

$id=$_GET['id'];

$sql="SELECT * FROM $tbl_name WHERE id='$id'";
$result=mysql_query($sql);
$rows=mysql_fetch_array($result);
?>

<table width="400" border="0" cellspacing="1" cellpadding="0">
<tr>
<form name="form1" method="post" action="update_ac.php">
<td>
<table width="100%" border="0" cellspacing="1" cellpadding="0">
<tr>
<td>&nbsp;</td>
<td colspan="3"><strong>Update data in mysql</strong> </td>
</tr>
<tr>
<td align="center">&nbsp;</td>
</tr>
<tr>
<td align="center">&nbsp;</td>
<td align="center"><strong>ID</strong></td>
<td align="center"><strong>First Name</strong></td>
<td align="center"><strong>Last Name</strong></td>
</tr>
<tr>
<td>&nbsp;</td>
<td align="center">
<input name="id" type="text" id="id" value="<?php echo $rows['id']; ?>">
</td>
<td align="center">
<input name="fname" type="text" id="fname" value="<?php echo $rows['fname']; ?>" size="15">
</td>
<td>
<input name="lname" type="text" id="lname" value="<?php echo $rows['lname']; ?>" size="15">
</td>
</tr>
<tr>
<td>&nbsp;</td>
<td>
<input name="id" type="hidden" id="id" value="<?php echo $rows['id']; ?>">
</td>
<td align="center">
<input type="submit" name="Submit" value="Submit">
</td>
<td>&nbsp;</td>
</tr>
</table>
</td>
</form>
</tr>
</table>
<?php
mysql_close();
?>


4. The out put of the above file looks as below.


5. When you want to update, just click on Submit button and it will take you to next page called "update_ac.php", refer the below code.
<?php
$id=$_POST["id"];
$fname=$_POST["fname"];
$lname=$_POST["lname"];

$host="localhost"; 
$username="root";
$password=""; 
$db_name="mars_db"; 
$tbl_name="list"; 

mysql_connect("$host", "$username", "$password")or die("cannot connect"); 
mysql_select_db("$db_name")or die("cannot select DB");

$sql="UPDATE $tbl_name SET fname='$fname', lname='$lname' WHERE id='$id'";
$result=mysql_query($sql);

if($result)
{
echo "Successful";
echo "<BR>";
echo "<a href='list_records.php'>View result</a>";
}

else 
{
echo "ERROR";
}
?>

6. The above code is having following output.


7. once you click on "View result" link as per above image, it will redirect to the "list_records.php", hence you'll have updated records. 

Thank you for reading and referring my blog. Keep reading mitindia blog for latest updates and don't forget to subscribe!. 

Wordpress on Local server

How to run / create a blog/website using Wordpress.

Brief About Wordpress:  It is a CMS(Content Management System), The most powerful open source plat-form for creating blogs and professional websites with over 24% of entire web share out of nearly 1 billion websites world wide. Over 26,000 plug-ins to use and enhance your Wordpress site features and stunning themes to look and feel.

In this tutorials you'll able to install, create and design website/blog using wordpress on local pc/laptop.

Step1:
Install WAMP (server) on your windows PC/Laptop.
Here is an tutorial to install wamp 

Step2:
After installing, open browser and type : http://localhost

Step3: You'll see following screen shot with WAMP Home page.

Step4: Click on "phpmyadmin" as per above image and create a database on mysql as following screen image.

After successfully creating the database "mywpsite", now go for next step.

Step5: Now download the wordpress software from here or
you can also refer below image for that.


Step 6: Unzip the folder and place that folder in C:\wamp\www location. [it looks like c:\wamp\www\mywpsite]

Step 7: Now open above site in the browser by typing : http://localhost/mywpsite (refer following image)


Step 8: Click on "Continue" then Click on Letsgo" button 


Step 9: Put here database name (which was just created), user name (commonly "root"), password (commonly blank) and local host, leave this as it is.[follow below screen image]


Step 10: Click on "Submit" button then you'll see following screen image.


Step 11: Click on "Run the Install" then you'll be redirected  to following page.


Step 12: provide all user details with email id as per above image. And Click on "Install Wordpress" button.

Finally you'll see following success page.


Now login with user name and password to create your local wordpress sites.

Thank you for reading my blog.